First, I wish to take a few moments to thank all of the Operation Write Home card makers who stopped by my blog last week. Seriously, I thought something had gone wrong with my blog stats thing. Usually my number of visitors, on a high traffic day, is 60. To see there were 500 that came by totally blew me away.
A heartfelt “Thank You” goes out to all of you who came by to take a gander at my public outing of a problem I have with paper. I appreciate each and every one of you.
My scrap paper project has been handled and I am quite happy with the results. This new project is to find out just exactly what kinds of rubber stamps I have hidden away in several drawers. I don’t consider myself a card maker…mostly because I don’t think I have the knack for it.
I accumulated several Stampin’ Up! stamps a few years back. Most of which remained in their boxes unused and chucked into the dark cavern of my closet. Not willing to spend the time involved in becoming a deft rubber stamp artist I pretended those blocks of wood with rubber on them were not even here. Time to get those stamps out of the dark and into the light. I need to take an inventory of what I have. I like the idea of making cards for our military heros to have something to send home to their family members.
I have a small crafting area and those boxes take up a lot of space. First on the agenda is to get all of the Stampin’ Up! wood mounted stamps unmounted. That project has been completed.

I have a package of weekly time cards I purchased from my local office supply store about three years ago. They have sat on a shelf and been forgotten.

These time cards are 4″ wide by 7″ long. I’ve lopped off the top inch, removing the punched holes, for the cards to measure 4″ x 6″.

I am the proud owner of a recipe box given to me by my daughter, Carissa, a couple years back. That box will do nicely.

The time cards fit nicely in the box and the stamped images are there for me to see.

I have created a video to show you how I use the plastic boxes for my stamp storage solution. The lids are cut off, trimmed down, and attached to photo copy paper that I have copied the cards to. This video takes you, briefly, through the steps of unmounting the rubber stamp and making it sticky backed with the use of Two Way Glue. I show you what I have come up with to reduce the space taken up by those boxes. My rubber stamps are going to be in a couple of 3-ring binders when I’m finished.
Once I have completed this project I will have to think about another one. What to do with all those blasted wood blocks!

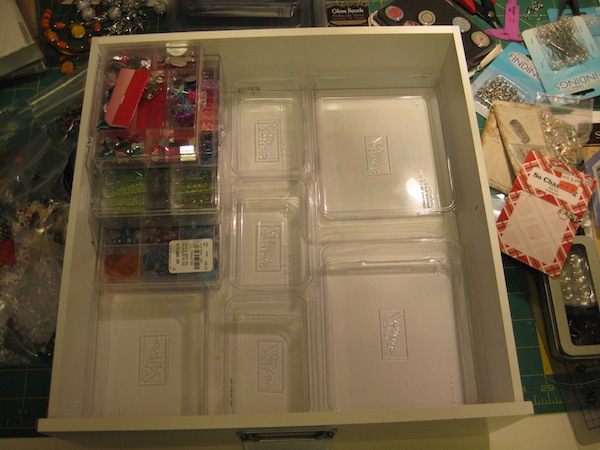
The plastic boxes have come in handy for my bead drawer. That thing is a tangled mess.


What is your system for knowing what rubber stamps you have? How do you keep track of your stamps? Do you prefer wood mounted over the cling mount? I’d love to know what you do with your stamps.
Leslie


Nov 30, 2012 @ 09:21:23
Not to rain on your parade, but, you might want to reinforce the holes in those page protectors. I used this same idea a while back with my acrylic stamps and most of the holes in my page protectors have split.
Dec 02, 2012 @ 16:33:42
My system is similar to yours Leslie but I stamp on good quality printer paper and I use two pieces of full size paper headed by theme such as flowers, birds, etc. One sheet of paper I laminate and the stamps stick to the back of this sheet so that when I open the binder I can see the stamped image and know which stamp I want. Once the stamps are put on the back of the laminated sheet I put each sheet into a page protector and then into a 2 ring binder. The second sheet is not laminated but put into a 2 ring binder which is indexed by binder number, I can flick through the index sheets and now which binder a particular stamp is in. I number each binder on the spine.
This system suits me and works for me.
Glad you are getting the chance to go through your hoarded stash and having a sort out 🙂
Love and hugs
Lynn xx
Dec 15, 2012 @ 19:50:47
I have unmounted some of my wood mounted stamps. I used the wood blocks as a distressing ink tool 😉
I like the quality of red rubber that the wood mount stamps provide, but I like the smaller space that clear mount take up 😉
Good luck with your storage solutions 🙂